

Here is a nice work bench stand build that will give you a little extra need room on your work station.
'We needed a space to get a few things off the table but still nearby for easy access so the solution was to create this simple work bench stand, and it works great!'
DOWNLOAD THE INCLUDED MODEL TO STUDY AND MODIFY THIS DESIGN TO FIT YOUR APPLICATION
PLEASE ALSO SEE INCLUDED PARTS LIST TO BUILD YOUR OWN WORK STATION TABLE.
The cost for this build comes at about 100 bucks


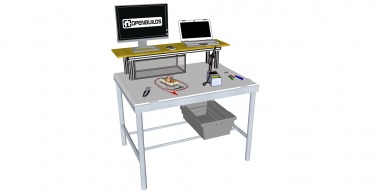
Exploded View
Lets Get Started!

ALL PARTS NEEDED TO BUILD YOUR 20X40 V-SLOT MONITOR STAND

TAP (WITH SELF TAPPING SCREWS) ALL FOUR CORNERS OF THE ENDS 20X40 V-SLOT
HERE ARE FEW TIPS TO TRY AND FOLLOW:
- TRY TO USE A DIFFERENT SELF TAPPING SCREW EVERY OTHER TIME YOU TAP A V-SLOT END. THIS KEEPS THE THREADS SHARP AND FRESH.
- SET YOUR DRILL TO LOW AND SET THE RATCHET LEVEL SO WHEN YOUR SELF TAPPING SCREW BOTTOMS OUT IT WILL NOT STRIP THE HEAD.
- ALSO REMEMBER TO DRILL IN SMALL INCREMENTS BACKING IN AND OUT AND RESTARTING AS YOU SET THE THREADS

-NOTICE- THREADS MADE IN TAPPED ENDS

TOOLS AND MATERIAL NEEDED FOR TAPPING THE V-SLOT
ALL MATERIAL FOR THE ENDS OF THE MONITOR STAND (L BRACKET SET UP WITH SCREWS)

-NOTICE- THE HOLES THAT ARE CLOSER TO THE BEND ON THIS L BRACKET.
THESE ARE THE HOLE SET WE WILL USE ON THIS MOUNTING

-NOTICE- AGAIN, THE L BRACKET IS EVEN TO THE V-SLOT SO YOU WANT THE HOLES THAT ARE CLOSEST TO THE BEND OF THE L

PLEASE PRESS DOWN WHILE TIGHTENING THE L BRACKET TO ENSURE A FLUSH MOUNT

AGAIN PLEASE PRESS DOWN WHILE TIGHTENING

FIND CENTER AND MARK IT

COMPLETE SIDE V-SLOT
BUILD YOURS THE SAME WAY

MATERIALS NEEDED FOR (FRONT AND BACK) BUILD OF THE TOP FRAME ASSEMBLY

AGAIN -NOTICE-HOLES THAT ARE CLOSER TO THE BEND OF L BRACKET ARE USED ON THIS BUILD

FRAME SET -UP AND PARTS WITH MATERIAL TO BUILD TOP FRAME OF MONITOR STAND

LETS WORK ON THE SIDES
-NOTICE- PRESS FIRMLY AND PLACE BOTTOM BLACK ANGLE CORNER CONNECTOR ON FIRST

LOOK CAREFULLY ON PLACEMENT OF L BRACKETS AND BLACK ANGLE CORNER CONNECTOR
AND MATCH THEM FOR YOUR BUILD

BLACK ANGLE CORNER CONNECTOR PLACEMENT
LAYING THE SIDES FLAT HELPS KEEP EVERY THING FLUSH AS YOU WORK THE SCREWS IN FOR THE CORNERS
BLACK ANGLE CORNER CONNECTOR INSTALLED(BOTTOM-FIRST)
MATCH THE SIDES AS SHOW FOR YOUR BUILD

LAYING OUT THE TOP FRAME PARTS NEEDED FOR ASSEMBLY

CLOSE UP OF FRAME ASSEMBLY CORNER WITH THE SELF TAPPING SCREWS

-ATTACH- CORNERS TO THE V-SLOT 20X40 WITH THE SELF TAPPING SCREWS TO ASSEMBLE THE FRAME
- REMEMBER-SET YOUR DRILL TO RATCHET WHEN THE SCREW BOTTOMS OUT
- ALSO REMEMBER TO DRILL IN SMALL INCREMENTS BACKING OUT AND RESTARTING IF NEED BE

-NOTICE- THE PARTS ON THE BUILD - LAYOUT 4 OF THE 40x40 LEGS FOR THE BUILD. AS WELL AS THE 8MM SCREWS AND TEE NUTS

READY TO SLIDE THE LEGS ONTO THE TOP FRAME ASSEMBLY
-NOTICE- TURN ALL OF YOUR TEE NUTS TO THE UP POSITION (ONLY TURN THEM ON A COUPLE THREADS IN) READY TO ACCEPT THE 40x40 LEGS AS SHOWN

YOU WILL NOW BE ABLE TO SLIDE THE LEGS DOWN INTO POSITION (HOLDING THE SCREWS HEADS OUT) ON THE L BRACKET.
TAKE YOUR TIME AND MAKE SURE EVERYTHING IS ALIGNED AND IT WILL GO SMOOTH
TIGHTEN DOWN THE SCREWS
THE FRAME WORK IS NOW COMPLETE

GETTING READY TO INSTALL THE TOP BOARD
FIND CENTER OF THE 1000mm BACK V-SLOT AT 500mm
-NOTICE- I AM MEASURING ONLY THE V-SLOT LENGTH, NOT THE CORNERS

MARK YOUR CENTER

FIND CENTER OF YOUR BOARD

AND ALSO MARK THE CENTER

ALINE THE TWO CENTER MARKS AND KEEP THE BOARD FLUSH TO THE FRONT.
THE WIDTH OF THE BOARD WILL FALL A LITTLE SHY ON THE BACK , BUT FOR US THIS IS OK AS IT IS NOT SEEN.

CLOSE UP OF MARKS LINED UP

LOCATE SOME FLAT BOTTOM PAN HEAD STYLE SCREWS THAT WILL WORK TO SCREW THE TOP BOARD DOWN

LOOSEN YOUR TABLE MOUNT L BRACKETS ON EACH SIDE

USE THE PAN HEAD SCREWS TO MOUNT THE TABLE TOP

RE-TIGHTEN THE L BRACKETS TO THE SIDE RAILS AND YOUR BUILD IS COMPLETE.
CONGRATULATIONS!

ADD THIS BUILD TO ANY WORK BENCH TO CREATE AN OUT OF THE WAY SPOT FOR YOUR COMPUTERS AND OTHER EQUIPMENT
Work Bench Stand
Build in 'Furniture Builds' published by Mark Carew, Oct 29, 2015.
Here is a nice little simple build that will help to free up some extra space on your work bench. If your like me you need all the room on your work station you can use, so this is great to have.
-
-
Build Author Mark Carew, Find all builds by Mark Carew
-
- Loading...
-
Build Details
- Build License:
-
- CC - Attribution - CC BY
Reason for this Build
Needed a space to get a few things off the table but still nearby for easy access. -
Parts list
Qty Part Name Part Link Comments 36 Tee Nuts (5mm) http://openbuildspartstore.com/tee-nuts-25-pack/ Link Sold in Packs of 50 Never huts to have a few extra Tee Nuts around for the next Build (for mounting the L brackets) 36 8mm Low Profile Screws http://openbuildspartstore.com/low-profile-screws-m5/ Link For mounting the L brackets 10 Double L Brackets http://openbuildspartstore.com/l-bracket/ Link For mounting the legs to the top frame 8 Black Angle Corner Connector http://openbuildspartstore.com/black-angle-corner-connector/ Link For creating the top frame assembly 16 Self Tapping Screws http://openbuildspartstore.com/self-tapping-screw/ Link For connecting the Black Angle Corner Connectors to the top frame 2 V-Slot 20x40 1000mm http://openbuildspartstore.com/v-slot-linear-rail/ Link For the front and back of the top frame assembly 2 V-Slot 20x40 250mm http://openbuildspartstore.com/v-slot-linear-rail/ Link For the sides of the top frame assembly 4 V-Slot 40x40 250mm http://openbuildspartstore.com/v-slot-40x40-linear-rail/ Link Used for the legs 4 3/8" pan style head screw http://www.lowes.com/Hardware/Fasteners/Screws/_/N-1z0yk3... Link Need to go to the store to pick out a simple screw for this application 1 Wood board 1"x1'x4' http://www.lowes.com/ Link This is the top board - find something suitable for your build. -