Welcome to Our Community

Some features disabled for guests. Register Today.

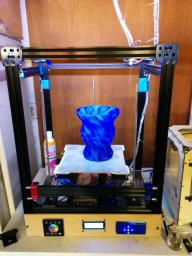
Triple C-Bot

Discussion in '3D printers' started by adamcooks, Feb 11, 2015.

  1. Austin Seagers

    Austin Seagers Well-Known
    Builder

    Joined:
    Oct 13, 2015
    Messages:
    88
    Likes Received:
    48
    Ah, I've never heard that. Thanks!
     
  2. adamcooks

    adamcooks Well-Known
    Builder

    Joined:
    Nov 6, 2014
    Messages:
    244
    Likes Received:
    65
    I did a post mortem on my smoked DC-DC SSR. I did definitely go bad. It was preheating to ABS temps, why im not quite sure, this large of a bed, in a cold basement, heating to 110 just pulled too much power for it to handle and it fried. It took about 10 minutes of preheating to do this. I replaced it with another, while I wait on a more permanent solution, about 80C it was very hot. I could barley touch the base of the heatsink, and touching the base of the SSR, singed the skin on my finger. I am a chef, and have 27 years of tempering my nerves against heat. I can touch very hot things, especially momentarily with my fingertips.
    DSC_0229.JPG DSC_0232.JPG DSC_0233.JPG DSC_0235.JPG DSC_0238.JPG DSC_0241.JPG DSC_0245.JPG
     
  3. Austin Seagers

    Austin Seagers Well-Known
    Builder

    Joined:
    Oct 13, 2015
    Messages:
    88
    Likes Received:
    48
    Are you switching DC? A MOSFET or array of MOSFETS will probably do better at those temps and cost considerably less.
     
  4. adamcooks

    adamcooks Well-Known
    Builder

    Joined:
    Nov 6, 2014
    Messages:
    244
    Likes Received:
    65
    I am switching DC, and now I know that should use a few fets for this. I think I may also switch my bed to a 24V unit. Less Amps with more Volts.

    Just finished modeling up the new gantry plate, which will use a off the shelf i3 extruder bracket. I will get it printing in the morning, maybe get it installed this weekend.
    wanhao gantry.png
     
  5. Rick 2.0

    Rick 2.0 OpenBuilds Team
    Staff Member Moderator Builder Resident Builder

    Joined:
    Dec 20, 2013
    Messages:
    2,899
    Likes Received:
    1,556
    For those of us who really don't understand electronics, can you give us a better idea of what kind of setup you are talking about there?

    thx.
     
  6. Austin Seagers

    Austin Seagers Well-Known
    Builder

    Joined:
    Oct 13, 2015
    Messages:
    88
    Likes Received:
    48
    Well, for the layman, a MOSFET is a switch (transistor) that is operated with the presence or absence of a voltage at an electrical "gate" connection. In this case, you would switch the transistor on and off with your regular heated bed power output.

    MOSFETs can be bought already mounted to a circuit board with the relevant connections available on connectors and are available in a massive amount of voltage and current capacities/ratings.

    I purposely left this a bit open-ended as it does require a bit of prior experience to implement as they're significantly less fault-tolerant in numerous ways than a solid state (or mechanical for that matter) relay.

    As a guide; an ~80A MOSFET of suitable voltage rating can be bought from RS/Farnell for <£2 in as low as single digit quantities.
     
    Rick 2.0 likes this.
  7. adamcooks

    adamcooks Well-Known
    Builder

    Joined:
    Nov 6, 2014
    Messages:
    244
    Likes Received:
    65
    Just finished up the new gantry and extruder mount. This one feels more solid then the others that I have used. I am hoping it plays nicely with the volcano block as well. Maybe I will get it installed tonightish, still waiting on my FET controller.
    IMG_20151120_111111.jpg IMG_20151120_111129.jpg
    [​IMG]
    covered in the discussion here . Coming custom from Jetguy. I may try to convince him to help me produce a good board for this to host on oshpark.
     
  8. Joseph Ecker

    Builder

    Joined:
    Apr 5, 2015
    Messages:
    30
    Likes Received:
    3
    Looking good! Are you planning on wrapping the hot-block with some kapton?

     
  9. Joseph Ecker

    Builder

    Joined:
    Apr 5, 2015
    Messages:
    30
    Likes Received:
    3
    After converting my bot to direct drive (using the STLs from the C-Bot page), I had a number of issues (not related to direct drive, though).

    Over the past few days I've been on a mission to stiffen up my printer's frame. Almost completely dismantled the electronics and most of the lower frame and moving Z-stage. I've added some long (~330mm) 45 degree brackets (printed out in PLA before the dismantling began) to the frame and early indications are that it will help stiffen the frame. I also un-twisted all the stepper motor cables and re-twisted the pairs, rather than twisting all four wires together.

    Anyone have thoughts on going to larger-diameter idler bearings? The artifacts I saw in my prints (before dismantling) led me to think the diameter of the idlers I have was too small.
     
  10. Austin Seagers

    Austin Seagers Well-Known
    Builder

    Joined:
    Oct 13, 2015
    Messages:
    88
    Likes Received:
    48
    Whoa, that is an accident waiting to happen if I ever saw one. Do i remember you saying somewhere that you bought your SSR from eBay or AliExpress? They're generally junk. Just buy a genuine one from Mouser or Digikey. They're rated for the max stated current if you bolt them to a heatsink :)

    I'm aware Jetguy is a highly regarded 3Dprinter, but come on... As a minimum, a schematic drawn in MS paint should be a gigantic red flag

    Extruder bracket looks very familiar! I have a wanhao i3 ;)
     
  11. adamcooks

    adamcooks Well-Known
    Builder

    Joined:
    Nov 6, 2014
    Messages:
    244
    Likes Received:
    65
    Back to printing tonight, one good calibration cube, one pla stormtrooper helmet fail. Dislodged from the glass, most likely due to not really prepping it at all, just a mist of aquanet. Installed my jetguy ssr and let it preheat for a bit to test. At 70C for 1 hour it was just barely warm to the touch, at 110 for 1 hour it was just warm. For full disclosure, my hand temp calibration is off due to many many years of professional cooking, I can touch very hot things.

    I installed my .8mm nozzle, the 1.2 was fun to play with but I think its too large for fine detail. I also installed some active print cooling. My first test cube came out ok, just needed a little extra restart for the corners. I will try again tomorrow after prepping the glass a little better. DSC_0364.JPG DSC_0362.JPG
     
  12. adamcooks

    adamcooks Well-Known
    Builder

    Joined:
    Nov 6, 2014
    Messages:
    244
    Likes Received:
    65
    So, when you remove Z height from your bot, be sure and tell your firmware that you did. Was printing a large Ocarina last night when I ran out of filament. This new extruder bracket removes 20mm of Z height, when I hit pause, the print bed goes crashing down into the floor of the bot, loosing steps and forgetting where it was in the z. 9 hours and a half a roll of PLA, derp. I used the first hald of the spool on a big benchy. It came out ok.
    DSC_0375.JPG DSC_0376.JPG DSC_0377.JPG DSC_0378.JPG DSC_0381.JPG DSC_0388.JPG DSC_0389.JPG
     
  13. alar

    alar New
    Builder

    Joined:
    Nov 28, 2015
    Messages:
    4
    Likes Received:
    0
    Adam,

    I've tried to find an answer on the forums to my questions but had no luck so hopefully you could help us or point us in the right direction. We really like the design of your printer and are wondering about its abilities.

    Though we have been having some good success with a printrbot simple metal, We thought it would be a good project to build a machine with a larger build area and hopefully better resolution and print quality.. We would like to be able to make some really fine, accurate, prints. After looking at the corexy system we thought it would be a great system, until we came upon your cbot style. My son and I are looking into building a c-bot with the 3 (xy) linear actuators on top like yours, possibly with the gantry made of c-beam using a belt system (gt2 or gt3) . We are thinking a build area of 14x18in. so the unsupported length of the gantry might be somewhere near 20"-24" . What kind of resolution do you think we could get using a head like the e3d-v6? is the v-slot concept the right one for accuracy and precision?

    Are we better off with ball screws vs a belt system? your thoughts and those of the others would be appreciated. I expect to return to this thread a great many times during our build.
     
  14. Joseph Ecker

    Builder

    Joined:
    Apr 5, 2015
    Messages:
    30
    Likes Received:
    3
    Hi Alar,

    Having just completed(?) a 18x18x18 Triple-C-Bot, I can give you a few things to watch out for :)

    1) Keep in mind that along with a larger build area, you're going to experience GREATLY increased print times. I used to think that 8 to 10 hour prints on my Rep1 clone were long... Unless you go with a bigger nozzle, you'll be in for a bit of a shock :)
    2) My build actually came out closer to 14 inches in the Z axis, mostly due to a larger Z stepper motor and a taller build plate mounting setup. Be sure to model it all before cutting your extrusion.
    3) For anything larger than, say, 12" squared, don't try bowden, go direct-drive. I could have spent many many more hours tweaking my bowden setup and might eventually get to somewhat satisfactory results, but still wouldn't compare to what I'm getting with direct drive.
    4) Add in extra braces and cross-supports where possible. Make the frame as stiff as possible. I put the question mark on the "completed", because I'm still working on making my bot's frame as stiff as possible.
    5) Your "resolution" largely depends on your nozzle diameter. I started out with 16T pulleys on my X and Y steppers, which worked out to be 100 steps/mm (with 1/16th microstepping). I switched to 20T pulleys, dropping it down to 80 steps/mm, and I cannot tell the difference (output is similar in "resolution" to my Rep 1 clone). I did this mainly to make things easier on the printer board (Azteeg X3 with a 2560). If you go with a 32 bit controller, that may become a moot point.

    My only regret with this build was cutting the vertical legs too short. I really should have triple-checked the modeled build height before cutting. It is, however, fairly straightforward to extend the printer in the Z axis, if I ever decide to do that :)

    -Joe
     
  15. adamcooks

    adamcooks Well-Known
    Builder

    Joined:
    Nov 6, 2014
    Messages:
    244
    Likes Received:
    65
    I'm sorry it took me a few days to get back to you on this, life has been in the way. I'm not sure I understand your question of ball screws vs belt. CoreXY is driven by belts, XY is only driven by two steppers and there are no linear actuators in the build. CoreXY | Cartesian Motion Platform gives a great explanation of how this system works. Ball screws are considered an upgrade to acme lead screws, which are an upgrade to threaded rod. C-beam is largely overkill for a 3D printer. It was meant for high load designs like a router, possibly for vertical towers of a very large delta bot. 20x40 is completely sufficient for 24" unsupported length. resolution is driven by a few things, the hotend being none of them. Steps/mm, derived by different size pulleys, will give you positional accuracy.

    Keep asking questions!.
     
  16. alar

    alar New
    Builder

    Joined:
    Nov 28, 2015
    Messages:
    4
    Likes Received:
    0
    Thank you for all your answers, It's a lot to take in. work got in the way this week so i'm trying to get some free time to think about more questions, after reading more posts and learning some more.
     
  17. mwu

    mwu New
    Builder

    Joined:
    Jun 24, 2015
    Messages:
    4
    Likes Received:
    3
    I started out looking to build a c-bot, but at a 12" cubed size it seems better to go with the triple leadscrew design you have. Your BOM's second tab has a form for the extrusion cut lengths which doesn't seem to have formulas embedded. Is it the same as the c-bot's?
     
  18. adamcooks

    adamcooks Well-Known
    Builder

    Joined:
    Nov 6, 2014
    Messages:
    244
    Likes Received:
    65

    My frame size was derived from Carl's calculator, almost. Its kind of like that between the two bots. My frame was made longer in the Y to accommodate dual extruders, while Carl's is wider in the X. My original plan was to put an extruder on both sides of the gantry and I added some 40 mm to the front to back measurement, and narrowed the X width. After building mine, there was some discussion of Carl's frame calculator being short in the Y. My additional 4cm gave me the depth to hit the entire build plate, but just with a front mounted stepper. I think that I will need to increase my frame depth from 420 mm to 480 mm to accommodate both extruders. Carl's bot uses dual extruders mounted side by side, they are just starting to play with direct drive and im not sure of any dual extruders direct yet. I still prefer the MBI Rep1 extruder setup compared to the bowden or the short tube "direct" drive of the e3d. Using the wanhao i3 extruder bracket has given me a great mounting point that I am finally happy with.
     
  19. certeza

    certeza New
    Builder

    Joined:
    Dec 29, 2015
    Messages:
    2
    Likes Received:
    0
    Are you using a closed loop belt for the z axes? The reason I ask is that in the photos the belt is not a closed loop.
     
  20. adamcooks

    adamcooks Well-Known
    Builder

    Joined:
    Nov 6, 2014
    Messages:
    244
    Likes Received:
    65
    Yes, the z belt is a closed loop. The photo shows how I measured it. The BOM reflects the actual belt used.
     
  21. mwu

    mwu New
    Builder

    Joined:
    Jun 24, 2015
    Messages:
    4
    Likes Received:
    3
    I noticed in earlier posts that you modeled everything in fusion 360. Is that publicly available?
     
  22. adamcooks

    adamcooks Well-Known
    Builder

    Joined:
    Nov 6, 2014
    Messages:
    244
    Likes Received:
    65
    I have shared the fusion files with a few folks in the past, what I need to do is figure out how to push it out to the autodesk gallery. I am about to start a new printer, for a buddy of mine, with a 200mm^3, I will use some new things I have learned modeling, and publish that one for sure. My .stl's were an exercise in teaching myself CAD and some things were done quite hack-y. I am pretty sure they are all good now, but if you read the thread some things had to be corrected. I will work on exporting step files for the fusion stuff.
     
  23. mwu

    mwu New
    Builder

    Joined:
    Jun 24, 2015
    Messages:
    4
    Likes Received:
    3
    Thanks, Adam. I asked because I may make a few small tweaks to use materials I have on-hand and also to reduce the number of places I'll need to order parts from. Hopefully the step files will import into OnShape, but I've been meaning to spend time to learn Fusion 360 for some time now as well.

    Is the 200mm^3 printer you're building for your friend going to be mostly the same or an entirely different design from this one?
     
  24. mhackney

    mhackney New
    Builder

    Joined:
    Feb 24, 2016
    Messages:
    4
    Likes Received:
    1
    I'd like to get some input / suggestions for a new build. I currently own 6 delta printers and a Taz 4 Cartesian built from a kit. I've built several dozen printers over the years but this is my first venture into Core X-Y.

    My plan is to build a Core X-Y printer with a 12" x 24" x 12" work envelope. The Triple C Bot seems like a good compromise for Z motion. One question I've pondered is should X (carriage) be 12" or 24"? I can make arguments to support each, what do others think or know?

    In this configuration, 2 of the screws would be at the corners of the long edge and the other at the middle of the long edge opposite. That should allow reasonable clear access into the printer and the long edge will be the front of the printer - I really don't care if this long dimension is labeled X or Y.

    For the table I'm thinking 1/4" MIC 6 with two 12"x12" silicone heaters underneath. A piece of PEI adhered to the top. This should be light, rigid and flat. I primarily print PLA but would use this for occasional ABS, Nylon and maybe NinjaFlex.

    Thanks in advance,
    Michael
     
    Carl Feniak likes this.
  25. AK Eric

    AK Eric Journeyman
    Builder

    Joined:
    Mar 31, 2015
    Messages:
    179
    Likes Received:
    129
    I think it's based on what you want to build vs the strength of those objects: Mine is 12x12x24-ish(tall), so it's great for printing tall things. But not wide things. If I wanted to build a table-leg, I could print it straight up, but since the layer-lines are perpendicular to its height, it would more easily snap if bent. However, if it was printed laying on its side, the layer-lines would run down the length making it much stronger.

    In my magical shop of the future I'll have both :p
     
  26. mhackney

    mhackney New
    Builder

    Joined:
    Feb 24, 2016
    Messages:
    4
    Likes Received:
    1
    Sorry, perhaps I wasn't clear - I'm talking about 24" wide by 12" deep x 12" tall. I have a delta with a 22" Z so I don't need tall, I need wiiiiide! I'm working on a 3D printed fishing rod (shhh!) and I just need something a little wider than I have to make longer sections. So the question, should I align X with the short 12" dimension so I have a short carriage travel or with the 24" long dimension so I have a long carriage travel. I'm leaning towards 12" X travel as I think that might lead to a more rigid mechanism.
     
  27. AK Eric

    AK Eric Journeyman
    Builder

    Joined:
    Mar 31, 2015
    Messages:
    179
    Likes Received:
    129
    Gotcha! I guess you totally could have a 'deep' printer, that would have a short X travel, but long Y: That would cut down on the overall mass of the top gantry, which is probably a good thing. You'd just have to workout the leadscrews to make sure they lift that oblong bed correctly. Maybe one in the front, and one in the back, like I'm doing?

    Or how about you just go 24x24? :p
     
  28. mhackney

    mhackney New
    Builder

    Joined:
    Feb 24, 2016
    Messages:
    4
    Likes Received:
    1
    That's what I was thinking - short X travel/carriage travel would reduce the overall moving mass. It also leads to a more rigid assembly with lighter materials (by this I mean one could make a more rigid assembly by using beefier frame extrusions, bracing, etc that all increase mass and especially moving mass).

    The reason I posted in this thread is the triple screw design. My thinking was as stated in my first post, that two screws would be at the corners of the long edge and the third in the center of the opposite long edge. Like this ("O" is a screw):

    -O-----------------------O-
    | |
    | |
    | |
    | |
    -------------O-------------


    Does this make sense? What about arrangement of the guides (not sure about whether I'd use OpenBuilds wheeled carriages on all 4 corners, or two in the middle of the short edges or some other arrangement. Perhaps linear guides?

    I don't want to take on the expense, table mass, and footprint of 24x24. Heating a 12x24 bed with a PEI surface is going to be a large enough expense and challenge. My target parts are long and skinny so I really don't need a bed that large. Not to mention not having enough bench space for a beast that large! I am going to increase the Z though to at least a working 18".
     
  29. AK Eric

    AK Eric Journeyman
    Builder

    Joined:
    Mar 31, 2015
    Messages:
    179
    Likes Received:
    129
    I was completely joking about 24x24 btw ;)
    The screw design you posted above is basically what others have done for smaller, wider beds. I'm no leadscrew expert though, but it seems like it should work.
     
  30. mhackney

    mhackney New
    Builder

    Joined:
    Feb 24, 2016
    Messages:
    4
    Likes Received:
    1
    It wasn't a *bad* suggestion Eric! But that would be a monster printer. Maybe next time!

    I posted on the google group asking for recommendations for the Z for this printer. So far, the triple c-bot seems to be the best option and it makes sense to me.
     

Share This Page

  1. This site uses cookies to help personalise content, tailor your experience and to keep you logged in if you register.
    By continuing to use this site, you are consenting to our use of cookies.
    Dismiss Notice